by Jayme Radomski | Apr 29, 2020 | Digital, Productivity
 Having organized digital files will improve your productivity at home and at work. There are three areas that need to be considered when organizing your digital files. The file name, the file folder structure and where the files are saved are all important. Each area is discussed in detail here.
There are a couple things that need to be considered before digital files can be set up. Consider who will access the files. If you are sharing files with a team of people, they all need to understand and agree with how the files are named. Having those agreements will ensure the success of your organizational system. Be consistent with how digital files are organized so that retrieval is streamlined.
File name
File name is unique to each file you save. When determining a name, consider the files you have and your unique needs. Consider how you retrieve the files. What is the subject you will look for? Is it a client name, date or project number? You will want to include this information in the file name. Use short, but descriptive names. Underscores are a good way to keep proper spacing in the file name.
Include three items in the file name in a consistent order:
- Date – Keep the format of the date consistent (year, month, day, i.e. 2020-04-21)
- Subject – The subject part of the file name will have a few key words that will tell you what to expect when the file is opened (client name or number, project name, or other subject such as “Lectures,” “Contract,” “Invoice”).
- Code – A special code or unique identifier in the file name can help understand the file. These codes could include terminology such as draft, template or final, initial or name of author, version, or other information to help the file stand out.
Directory or File location
The directory or file path, should be simple and consistent across files.
How folders are named is an important part of the file name.
Business files may have names such as the client name, project name, project number, author name, administrative, vendor, contractor and/or facility.
Here are examples of how I would label my files for teaching, business and personal:
School
- Course Number and Name
- General Course Information
- Lesson Sheets
- Lecture Notes
- Handouts
- Assignments
- Laboratories
- Exams
- Professional Development and Training
- Human Resources
- Department
Business
- Administrative
- Client Last Name, Client First Name
- Contract
- Receipts
- Invoices
- Photos
- Marketing Contractor
- Graphic Design Contractor
- Carpenter Contractor
- Organizing Contractor, Last Name, First Name
- Vendors
- Network
Personal
- Taxes
- Medical
- Utilities
- Phone
- Automobile
- Insurance
- Kids School
- Kids Activities
- Investments
- Bank
- Pet
- Boat
Saving Files
Common Mistakes
- Saving to your desktop, instead just put a short cut on your desktop.
- Overcomplicating and over thinking where files get saved and what the name should be. Keep it simple.
- Avoid confusing abbreviations and acronyms.
Be consistent across all file and folder names. Consider: Google Drive, Box, iCloud, Drop Box, and Email Folders. Pick a method to back up your files. You may select cloud-based storage or an external hard drive. Personal information should be backed up to a removable drive.
Like any organizing project, there are five basic steps to getting your files organized:
- Gather: Make a list of all the categories of files you have. Include physical files, digital files, and email files.
- Sort: Group them into logical categories. There will likely be main categories and subcategories
- Purge: Remove the files that are not needed anymore.
- File: Create files for all of the main categories and subcategories. Place files into the folders in chronological order with the newest files toward the front. When a new file comes in, it is front and center.
- Label: Label the folders. Keep labels consistent across paper files, digital files and email files.
Too Overwhelming?
Start from ground zero if you are truly a hot mess. Set up an organized file structure and begin organizing the files that are current. Don’t worry about old files right now. Take some time to work out the bugs of your new file structure. Once you are settled into a routine and your file system has proved to be effective, go back and organize your older files.
At Top Shelf, we love to help busy professionals and families establish an effective filing system to improve productivity and reduce stress. See how we can help you get this area of your busy life organized. Reach out to Jayme for some tips on getting your files organized.
by Jayme Radomski | Apr 2, 2020 | Money & Paper Management, Organizing
 Being organized can be especially helpful in times of emergency. It is a good idea to have an emergency kit ready to go, and to have a plan that is communicated to all members of your household. The list of items that could be needed is exhaustive and endless. The importance of being prepared means you have the supplies and documents ready for your household in case of an evacuation, as a worst-case scenario. Keep in mind, business could be closed, banks could be closed and the internet could be down. Here is a guide of suggestions to getting organized for emergencies. A formal kit can be found at ready.gov.
Food and Water
- 7- to 10-day supply of non-perishable food and water
- Include some comfort foods to help ease anxiety
- One gallon of water per person per day as a guideline
Money
- Small denominations, ten-, five- and one-dollar bills
- To purchase food, gas, other daily needs
- Amount depends on the size of your family ($2,000 cash is a good starting point to allow for basic needs and travel if evacuation is needed)
Medications
- Prescriptions for at least two weeks
- Non-prescription including pain relievers, stomach remedies, cough and cold remedies, fluids with electrolytes, and vitamins
- Medical records
Documents
Store copies of these in a fire proof safe inside a water-tight container, in a bank safe deposit box, and copies at a trusted friends or relative. You can also keep a digital copy in a removable drive.
- Personal Information
- Driver’s license or another photo ID
- Birth certificates, adoption certificates, custody documents
- Marriage license, divorce degree
- Social security card
- Child identity cards
- Passport/green card, naturalization documents
- Military: military id, military discharge record
- Pet: id tags, prove of ownership, microchip information, emotional support letter, certification for service animals
- Household Information
- Name, date of birth, place of birth
- Address and mailing address
- Name of spouse or partner
- Employment information including supervisors with contact information
- Spouse employment information
- Emergency contact
- Children information: name, address, date of birth, email, phone, school
- Financial and Legal
- Estate planning
- Living will, trust, power of attorney and advanced directives
- Financial
- Checking, saving, investments, retirement
- Print and keep a hard copy of the most current bank: name of institution, type of account, account number, institution phone number and website
- Sources of income
- Pay stubs, government benefits, alimony, child support, rewards accounts
- Tax Statements
- Previous year’s tax return, property tax, personal property tax
- Insurance
- Health, property, life, automobile, disability, appraisals, pet, flood, funeral
- Firm name, name of policy holder, policy number, claims phone number, type of policy, value, coverage period, website
- Understand how your home or renter’s insurance can assist you in an emergency
- Video or photograph rooms in your home and valuable belongings
- Financial Obligations
- Housing, utility, loan, credit card, child support
- Have a list of what bills are on autopay, download and print a copy of your last statement or applications to enroll
- Document and print your FICO score
Fuel
- Keep tank of gas above half full at all times
- Have fuel available for your back up generator
Supplies
- Battery-powered or hand crank radio and NOAA Weather Radio with tone alert
- Flashlight and extra batteries
- First aid kit
- Whistle
- Dust mask
- Plastic sheeting and duct tape to create a shelter
- Moist towelettes or wet wipes, trash bags with ties for personal sanitation
- Tools (wrench or pliers) to turn off utilities
- Can opener for canned food
- Local maps
- Cell phone with charger
- Battery pack charger for phone
- Personal hygiene supplies
At Top Shelf, we love to help busy families plan and prepare. If thought of planning for an emergency is overwhelming, see how Jayme and her team can help.
by Jayme Radomski | Mar 10, 2020 | Bathroom, Clutter, Organizing
 Let’s be ruthless and get our overstuffed linen closets cleared out for real. We expect these little closets to hold too many items. To get the linen closet to a reasonable condition, lets look at the contents category by category. Empty out all the contents of this closet. Also, consider linen closet items that are not stored in the linen closet but fall into these categories. You might find these items in your bathroom, under your bed, in the kitchen, in the bedroom closet, and possibly in the car, garage, basement or attic. After we retrieve these items from around the house, sort them by category. Once we follow the guidelines below for each category, we can have fun organizing them back into the closet and labeling for continued organization.
At Top Shelf, we feel less is more and we like to keep only what we need. Here is a guideline of some typical items to consider.
- Paper Products
The linen closet is an ideal space to store extra paper products such as toilet paper and facial tissue. Keep a minimal amount of back up product in your bathroom due to limited space and the humid environment. Purchasing paper products in bulk can save money, but be aware of your storage space. You will want to avoid too much overflow into other areas of your home, unless you have ample overflow storage.
- Bath Towels
Keep two towels per person living in your house, and a couple fresh towels for guests. The extra towels can be donated to a local pet shelter.
- Hand Towels
Keep two or three hand towels per bathroom, or two hand towels per person living in your home. A couple fresh hand towels for guests is acceptable. Extra towels can be donated to a local pet shelter.
- Wash Clothes
Inventory your wash clothes and keep exactly what your family uses per week. Some people may use two wash clothes per day and others may only use a wash cloth on occasion. This category is very specific to your household. Consider donating extras to an animal shelter.
- Beach Towels
Beach towels are also unique to your household. The amount you need will depend on your lifestyle, how often you are at the beach, at the pool, on a boat or camping. You will need to figure out how many beach towels are reasonable to keep. If your kids spend their summer at camp with a swimming pool, you may want to consider a few extra towels in your inventory. If your family is more of a weekend warrior at the beach and lake, one towel per person is reasonable. These seasonal towels can be packed away and placed into storage during the winter, if they are not needed. Remember, you can always toss them in the wash when you get back from the lake or the pool so they are ready for the next day. Extra beach towels can also be donated to a local animal shelter.
- Medical Equipment
Medical equipment can take up a large section of real estate in a linen closet. Equipment only used seasonally or during an occasional illness may be stored in another location such as the basement or a larger closet. Equipment that is used regularly can remain in the linen closet as long as there is space.
- Medications
Medication’s should be gone through on a regular basis. When going through medications, gather all your medications in one location. Check the expiration dates of all medications. Also, consider medications that are not needed anymore. After the unneeded and expired are removed, you can sort the remaining into categories such as daily use, illness specific and kids’ medications. Local pharmacies and governments host collection days to safely dispose of medications.
- Toiletries and Personal Care Items
Toiletries and personal care items should be gathered and sorted. Remove the items that are expired, old and not used anymore. Place partially used products in the front of the closet to use them up first. Plan to use up your inventory of products before purchasing new items. Write down your inventory or take a photo to help resist the temptation to purchase these products before depleting what you have. These products tend to build-up, especially if you are into trying the newest products. Unopened, unexpired and unwanted products can be donated to local homeless shelters.
- Cosmetics
Before we dive into cosmetics, lets have a quick general discussion on the shelf life of them. In general, unopened cosmetics have a shelf life of two to three years. This depends on the product and where the product is stored. If a product is exposed to heat, light and humidity, even if unopened, the shelf life is reduced. A list of typical shelf lives of products is provided. However, the method of application will affect the life of the products. If you use your fingers and hands to apply products or do not keep applicators clean, the life is reduced due to the bacteria allowed to enter the product.
Application brushes: two to five years
Blush: one to two years
Eye shadow: one to two years
Eye liners and pencils: one to two years
Foundation: six to eighteen months
Lip products: one to two years
Mascara: three months
Skin care products: six months to one year
Sunscreen: one to two years
- Bed Sheets
The linen closet easily becomes a graveyard for old, unused bedding. These items should be cleared out of the closet, and grouped by set and size. Then, you can decide on what sets to keep and what sets to donate. Two sets per bed is a good rule of thumb. Keep an extra mattress protector for each size of bed, if you have young kids in the house. One set of bedding for the guest bed is plenty. If needed, you could pull a set from your regular bedding for the guest bed. Organize the sheets sets you plan to keep by bed size, and place them into a linen bag or in a labeled bin or basket.
- Non-Linen Closet Items
Any item that does not fall into the linen closet categories doesn’t need to be in the linen closet. Items often found in a linen closet include food, toys, games and clothing. These items could be placed in the kitchen or bedroom closets.
At Top Shelf, we love to see the freedom organizing a small space can bring to you and your household. Let us know how your linen closet project goes by posting photos at Top Shelf Home Organizing Facebook page. Need some guidance getting started, get in touch with Jayme.
by Jayme Radomski | Feb 12, 2020 | Busyness, Managing Time, Productivity, Saving Time
You should protect your time with time blocking, regardless of your responsibilities. Whether you are a busy professional well into your career, a full-time caregiver to your family, or just juggling many responsibilities, blocking your time will set boundaries around your professional and personal time and allow you to maximize your productivity.
Blocking your time is a written reminder of where you need be, literally and mentally, at any time of the day. Time blocking allows you to focus deeply on the task that needs to be completed. For example, when you have time blocked for self care in your schedule, all you need to focus on in the self care time block is caring for yourself. Just like budgeting your money, time blocking makes you aware of how you spend your time (and where you waste your time). Time blocking is a written commitment to what you spend your time on.
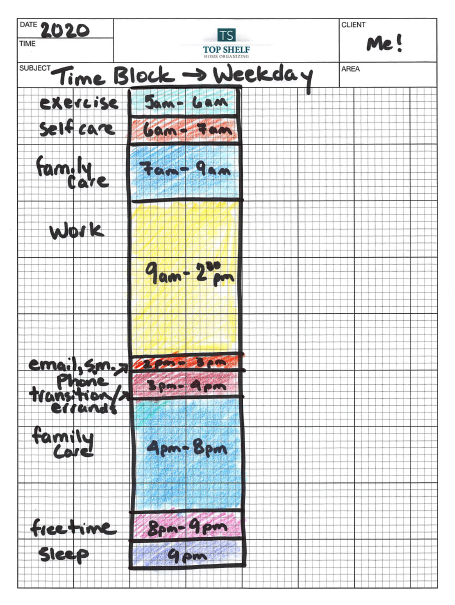
To start time blocking, make a list of your daily tasks, this is a high level list. Each task may have multiple sub-tasks within it. We will address these later. This is just a list of what you should do everyday. As an example, here is a list of Jayme’s daily tasks. Included in the list are a couple items I would like to make time for (reading, a hobby and free time).
- Sleep
- Self care
- Family care
- Reading
- Exercising
- Work
- Email, Social Media
- Planning for tomorrow
- Free time
- Hobby
Combine smaller tasks into a task batch. Task batching is grouping smaller tasks into one chunk of time. This could include checking and responding to email, returning phone calls and checking social media. Another batch may include a few items that are complete during some personal time (reading, hobby and free time). A morning routine could also be batched, as these events naturally occur together and fit into a schedule by design (self care, family care and exercise). In this example, family care is also a batch. Family care may include cooking, mealtime, bathing, homework help, and carpooling.
Your work time is naturally where you would task batch items you need to complete to make money. Notice I wrote, “make money.” This is where you mark your time as busy to focus on the items that eventually pay your bills. You tell your assistant or whoever you work with that your door is closed, and non-critical family chats and conversations can wait. This is the time you focus on your work. There are other times of your day where you may mark yourself busy, as well. These times may be when you are physically not available such as sleep and exercise.
Day theming works well if you have large portions in each day that you need to dedicate to different areas to meet the same goal. For example, if you work from 9am to 3pm each day, you may want to dedicate one day for client meetings and client follow up, another day for writing, another day for administrative tasks, and two other days for marketing. If you have projects, there are days of the week you may need to dedicate to the one or many projects you have going on.
Time blocking takes planning and revisions. Your initial plan for a time block may need to be revised frequently in the beginning. Give yourself some grace. If you are not seasoned to planning your day, keep it very simple in the beginning and allow flexibility. Life if going to happen and your schedule may go astray. You will find peace though knowing that there is a daily plan, and if you stick to the plan productivity will happen. As your productivity increases and evolves, you will find more free time in your day and your week.
Time blocking can be done with a simple paper calendar or planner, or with an online calendar or application. I would recommend starting with a simple paper and pencil to plan your time. After getting used to the idea of scheduling your time into blocks, try a digital calendar or app where you can experiment with colors and tags.
If planning your time causes you stress and anxiety, Top Shelf Home Organizing would love to help you on your journey. Jayme can help you plan your time blocking, set your goals, and keep you accountable to meeting those goals.
by Jayme Radomski | Jan 8, 2020 | Clutter, Organizing, Saving Time

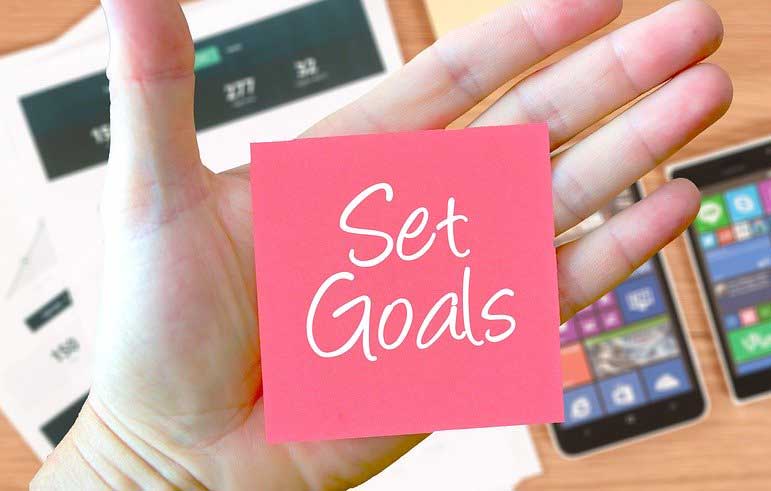
Setting Realistic Organizing Goals
In this new year and new decade, I want to share with you some simple ideas on how to set goals to be more organized in 2020. Being organized is a journey. To expect to become completely organized this month if you have not been organized in the past year or decade is unrealistic. Setting small weekly goals to get your home organized will be more manageable, leave you time to continue with your daily activities, and allow you to celebrate many small victories.
5 W’s of Goal Setting
Take some time to think about the benefits of being organized, and what that will look and feel like for you. Start a journal or notebook to track your progress, motivations, slowdowns and feelings. A good guideline for setting goals is to look at the five W’s.
- Why is it important for you to become and stay organized? How will this help you to be the best you?
- Where do you think you need the most organization? Is it an area of your home? Is it an area of your office? Would having more structure to your schedule be beneficial?
- When will you accomplish your goals? When will you make time to work on your goals? Set a realistic time frame to meet your goals. Getting organized is a journey, not a one-stop trip. Plan time in your days and your weeks to accomplish small goals.
- Who will be affected by being organized? Obviously you will directly benefit. Think about the other people who will positively benefit from organization and structure. Your boss will feel the benefits of your workspace being organized and your schedule more structured. Family members will see the benefits of an organized home and feel the benefits of you being less stressed. Relationships will flourish when this area of your life is under control.
- What do you want to organize? Look at the big picture and break it down into small steps and then into even smaller steps. If you want your entire home, office, storage unit, garage, attic and vacation home organized, you will need to set goals in each area. Furthermore, goals will need to be set for each room, and then even smaller goals will need to be set for each file, drawer, closet, box and bin. For example, if your goal is an organized bedroom, you will want to break your bedroom down into smaller categories. These smaller categories could include closet, dresser, under bed storage, bathroom and linen closet. Each of these areas can be broken down into very small projects that take just minutes. Your dresser can be separated into smaller categories such as undergarments, socks, pajamas, swimwear, t-shirts and accessories. A similar method can be applied to other areas.
Goal Setting Basics
- Specific
Be specific about your goals. Goals should be specific to what you really want and need to be organized. Go further than general statements like “I am going to get organized” and “I am going to organized my whole house.” Specific goals will go deep and detail areas of your home, and further into rooms, and then into drawers, closets, categories, boxes and bins.A calendar is a great way to break down your project into small specific goals. Each month you will have a large goal. The large goal can be broken down into smaller weekly goals, and then even further into very manageable daily goals. The smaller goals should be focused on achieving a larger goal to ensure a part of the project gets completed. If you are working on basement organizing, the smaller goals should lead you to accomplishing that larger goal.
- Measurable
You will want to have a way to measure your progress. Progress with getting organized can be a photo to visually remind you of what you have accomplished. It will help to know where you started and how far you have come. A simple check list or spreadsheet can also help you mark off your progress.
- Attainable
Set goals that you can achieve. Success meeting your goals will motivate you to keep going. Setting goals that will only take minutes a day will be more attainable than goals that take many hours out of your week. An attainable goal for you may be cleaning and organizing a refrigerator shelf, not the entire refrigerator. It will always feel better to move on to the next small goal when you have time than to set goals so large you cannot complete even one.
- Realistic
Be realistic about your time, lifestyle and goals. If your weekends are packed with running to activities and enjoying time with family and friends, you may only have a few minutes to work on your goals. Don’t plan to organize your entire office on Saturday if you have a full schedule. That will only lead to failure and frustration.
- Timely
Set timely organizing goals. Making progress will keep you motivated. If you plan for an organizing project to go on too long, you may lose focus. Planning your goals to be accomplished in a timely manner will help you and others see and learn that progress has happened and keep you going.
There are many monthly and daily organizing calendars available online. These can provide a great guide for you to plan your organizing journey. Top Shelf Home Organizing would love to help you on your journey. Jayme would be happy to help you set your organizing goals, and help you achieve your organizing goals.

 Having organized digital files will improve your productivity at home and at work. There are three areas that need to be considered when organizing your digital files. The file name, the file folder structure and where the files are saved are all important. Each area is discussed in detail here.